Transparent encryption: pros and cons
-
In this article, we are going to tell about transparent encryption implemented by means of CyberSafe Top Secret software. Along with this program, we shall demonstrate how to decrypt files encrypted with EFS.
- - Hardware problems: a motherboard failure, a loader failure, system files are damaged due to a hard drive failure (bad sectors). As a result, a hard drive can be connected to another PC to copy its files, however, if they are EFS-encrypted, you can’t do this.
- - The system was reinstalled. There are numerous reasons to reinstall Windows. In this case, it is obvious that the access to encrypted files will be lost.
- - A user profile has been deleted. Even if you create a user with the same name, he receives another ID and you still can not decrypt the data.
- - A system administrator or a user himself has cancelled the password. This also results in the loss of access to EFS-data.
- - Incorrect moving of a user to another domain. If a user was moved improperly, he will be unable to access his encrypted files.
- Close the snapin and try to access the encrypted file. It’s no use, despite it was encrypted by you, because the certificate was deleted.
- Change a user name and launch the Advanced EFS Data Recovery program. Try to decrypt the file as described above. At first, the program reports that the certificate was not found. Therefore, proceed to the EFS related files tab and click Scan for keys. After a while, the program reports that it has found keys, but probably not all of them (Fig. 15). The program recommends to scan for keys once more, this time - with the option Scan by sectors enabled (Fig. 16). I did not perform it and proceeded directly to the Encrypted files tab. The program has found and decrypted the file successfully. The Figure 17 shows that I have already saved the decrypted file on my desktop.
- When the folder is off, the files can be copied anywhere in the encrypted form, allowing to organize cloud encryption.
- The driver of the CyberSafe program allows to work in network, enabling corporate encryption.
- To decrypt the folder, you need not only to know the password, but also to have appropriate certificates. When Crypto-pro is used, the key may be transferred to a token.
- The CyberSafe application supports the AES-NI instruction set, which is favourable for the program’s performance (confirmed by testing above).
- You can protect personal keys against unauthorised access by means of two-factor authentification. Support of trusted applications

Some words about transparent encryption In our previous articles, we demonstrated how the CyberSafe Top Secret program can be used to encrypt physical disks and to create virtual encrypted disks. However, this type of encryption is not always convenient. Firstly, sometimes we can not encrypt the whole physical disk. Secondly, if you use virtual disks, container files usually take hundreds of megabytes on the disk and are easily detected by an intruder. Of course, there are data hiding methods, but human laziness always wins. Thirdly, an encrypted folder may go on growing, while a cryptodisk size is limited to the value defined at the moment of its creation. Everybody would like to both handle files conveniently and have reliably protected files. We can find such a compromise in the form of transparent encryption, when files are encrypted and decrypted on-the-fly, while they are being processed. The files remain encrypted and you work with them just like with regular files. For example, if you have encrypted the folder C:\Documents and placed your documents into it, those documents can be opened with Word or Excel applications, which are unaware of the fact of encryption of the files they deal with. You can work with encrypted files just like with usual ones, without any thought about encryption, mounting, virtual disks etc. Along with usability, transparent encryption has another weighty advantage. Usually, there are many files stored on virtual encrypted disks. You need to connect the whole cryptodisk even when you want access only to one of them. As a result, the other files are also exposed to risks. Of course, you could create multiple small cryptodisks with their separate passwords, but it would be a rather inconvenient solution. With transparent encryption, you can create as many encrypted folders as you need, each of them used for different file groups – documents, personal photos etc. In this case, only currently accessed files are decrypted, rather than all files of the cryptodisk at once. Pros and cons of EFS For transparent encryption, Windows (starting from Windows 2000 and except Home-versions) traditionally uses EFS (Encrypting File System). EFS is designed to prohibit access of a user to another user’s files (encrypted). Why to develop EFS, while NTFS maintains access rights differentiation? Despite NTFS is a rather secure file system, numerous utilities ignoring NTFS access rights have appeared (NTFSDOS was one of the first ones, it allowed reading files available on NTFS-partition from DOS environment). Thus, additional protection became urgent. EFS was deemed to play this role. In fact, EFS is an add-on for NTFS. EFS is convenient because it is a part of Windows; so you need no additional software to encrypt files, as your Windows has already all the necessary. To start encrypting, no preliminary actions are expected, because during the first encryption, an encryption certificate and a private key are automatically created for the user. Another advantage of EFS: when a file is moved from an encrypted folder to another one, it remains encrypted; when a file is copied to an encrypted folder, it is encrypted automatically. You need to perform no additional manipulations. Undoubtedly, such an approach is very handy, and a user has an illusion the EFS has nothing but advantages. Unfortunately, this is not true. On one hand, under adverse circumstances, encrypted files can become absolutely inaccessible. It can occur in such cases:
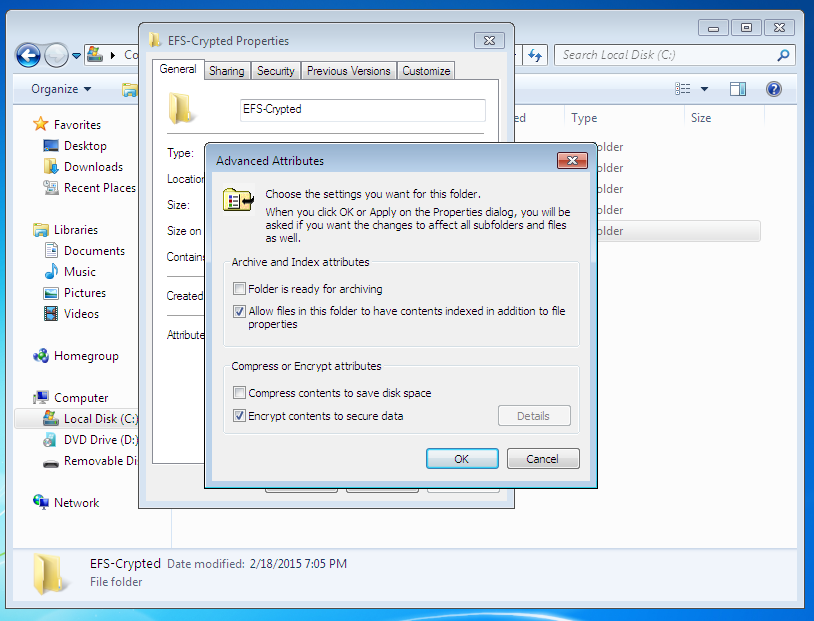 Fig. 1. Folder encryption turn-on
The encrypted folder’s name and names of all the files (encrypted automatically) it contains are displayed in green in Explorer. The Figure 2 shows that I have added a text file config.txt into the encrypted folder. We are going to read this file after we have entered the system under another user name. For the purposes of the test, we have created an administrator user name (the ElcomSoft Advanced EFS Data Recovery (AEFSDR) program requires administrator permission), see Fig. 3.
Fig. 1. Folder encryption turn-on
The encrypted folder’s name and names of all the files (encrypted automatically) it contains are displayed in green in Explorer. The Figure 2 shows that I have added a text file config.txt into the encrypted folder. We are going to read this file after we have entered the system under another user name. For the purposes of the test, we have created an administrator user name (the ElcomSoft Advanced EFS Data Recovery (AEFSDR) program requires administrator permission), see Fig. 3.
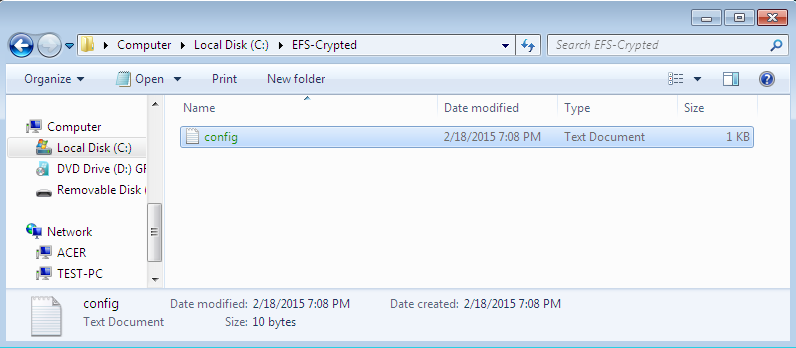 Fig. 2. The content of the encrypted folder
 Fif. 3. A new user created
Of course, if you enter under another user name, you can not read the config.txt file (Fig. 4).
Fif. 3. A new user created
Of course, if you enter under another user name, you can not read the config.txt file (Fig. 4).
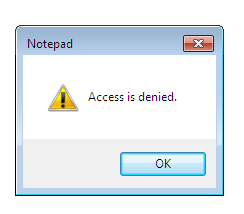 Fig. 4. Access denied
But never mind! Let's launch the Advanced EFS Data Recovery program and proceed to the Expert mode (you can use the master opened at the first launch (Fig. 5), but I prefer the Expert mode).
Fig. 4. Access denied
But never mind! Let's launch the Advanced EFS Data Recovery program and proceed to the Expert mode (you can use the master opened at the first launch (Fig. 5), but I prefer the Expert mode).
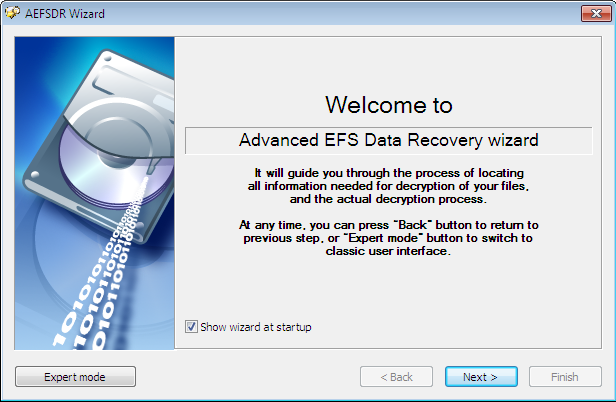 Fig. 5. Master at launch of Advanced EFS Data Recovery
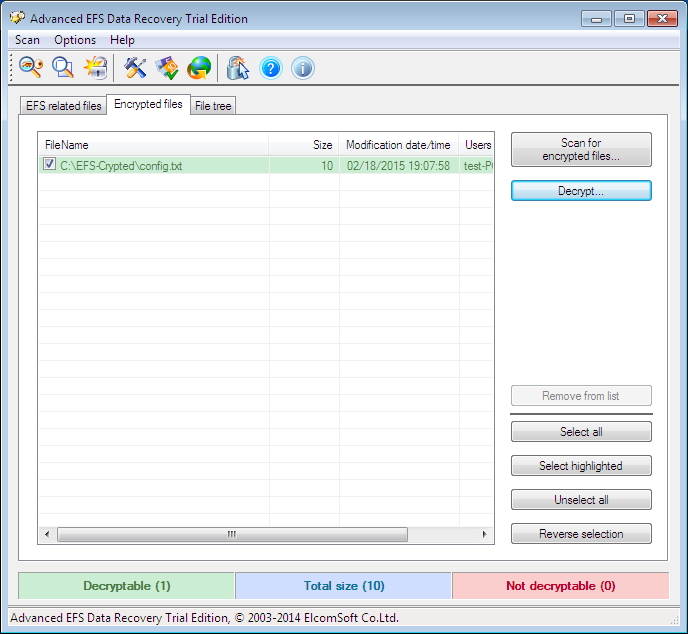 Fig. 6. Expert mode of Advanced EFS Data Recovery
Now, proceed to the Encrypted files tab and click Scan for encrypted files. Figure 6 shows the result of scanning – the only encrypted file C:\EFS-Crypted\config.txt has been found. Choose it and push Decrypt. The program offers to choose a destination folder for decrypted files (Fig. 7).
Fig. 6. Expert mode of Advanced EFS Data Recovery
Now, proceed to the Encrypted files tab and click Scan for encrypted files. Figure 6 shows the result of scanning – the only encrypted file C:\EFS-Crypted\config.txt has been found. Choose it and push Decrypt. The program offers to choose a destination folder for decrypted files (Fig. 7).
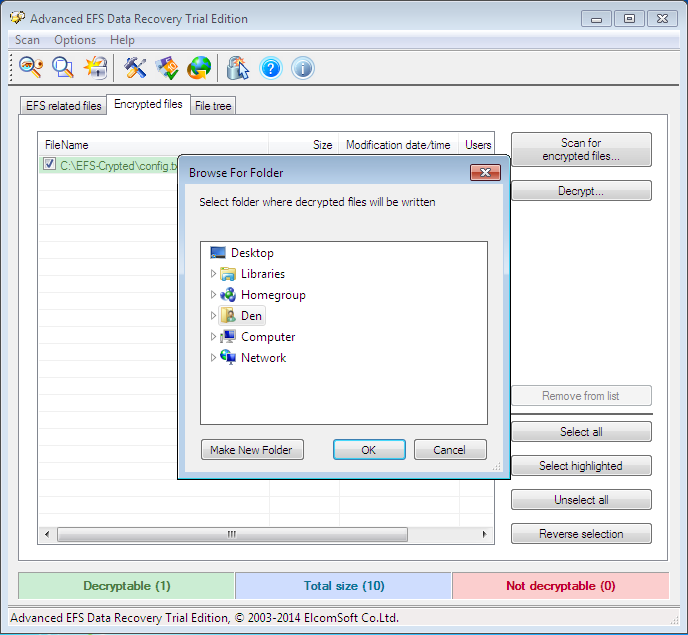 Fig. 7. Choose a destination folder for decrypted files
As I have a trial program, I need to click Continue to proceed (Fig. 8). The decrypted files are sent to the subfolder AEFS_<имя_диска>_DECRYPTED (Fig. 9). Notice that our file config.txt is no more highlighted in green and we can read its content (Fig. 10).
Fig. 7. Choose a destination folder for decrypted files
As I have a trial program, I need to click Continue to proceed (Fig. 8). The decrypted files are sent to the subfolder AEFS_<имя_диска>_DECRYPTED (Fig. 9). Notice that our file config.txt is no more highlighted in green and we can read its content (Fig. 10).
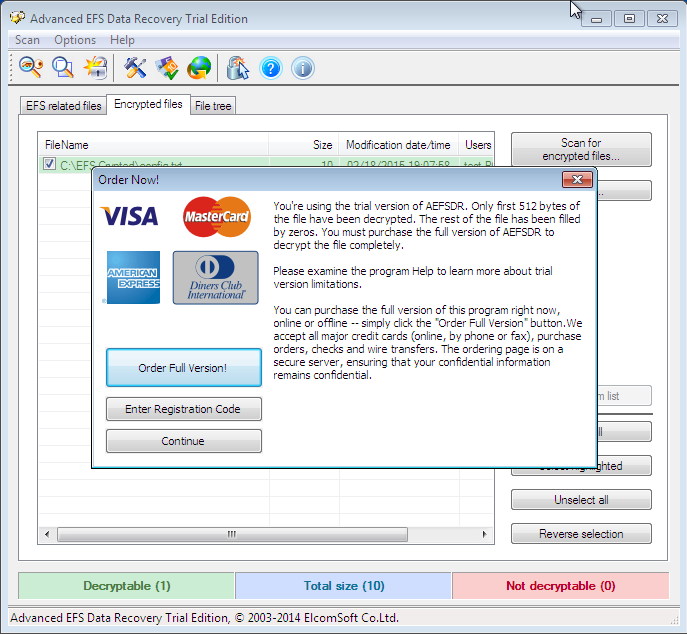 Fig. 8. Click Continue
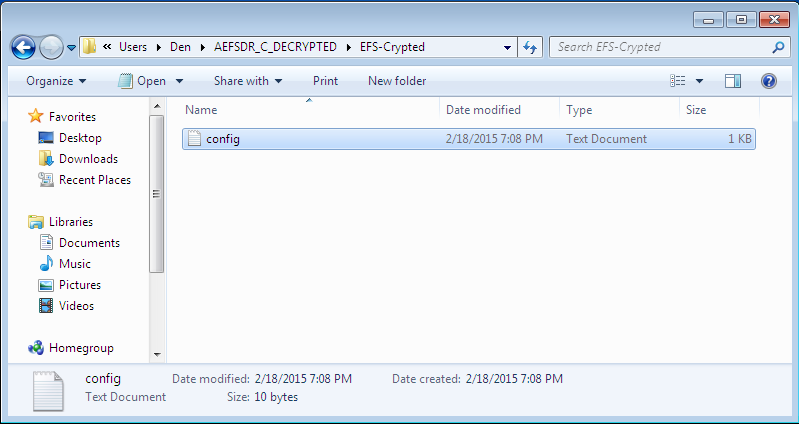 Fig. 9. Decrypted files
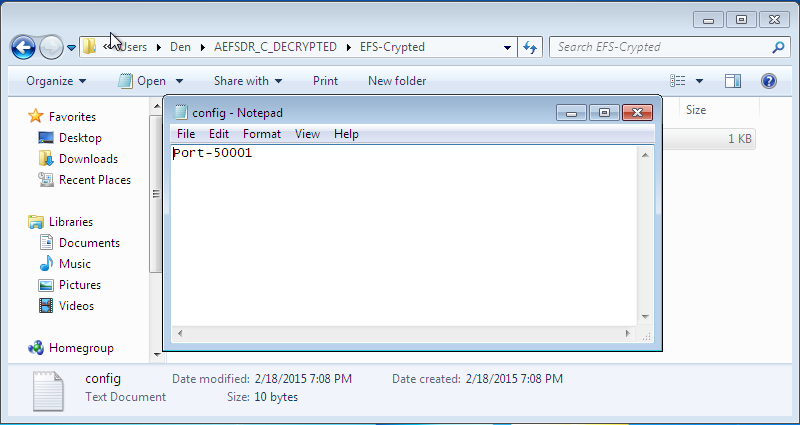 Fig. 10. Content of config.txt
Now, let’s complicate the task for Advanced EFS Data Recovery by deleting a personal certificate. Enter under the user name who created the decrypted folder, launch the mmc console and select the menu item File, Add/Remove snapin. Then, select the snapin Certificates and click Add (Fig. 11). In the window that appears, select My user account (Fig. 12).
Fig. 10. Content of config.txt
Now, let’s complicate the task for Advanced EFS Data Recovery by deleting a personal certificate. Enter under the user name who created the decrypted folder, launch the mmc console and select the menu item File, Add/Remove snapin. Then, select the snapin Certificates and click Add (Fig. 11). In the window that appears, select My user account (Fig. 12).
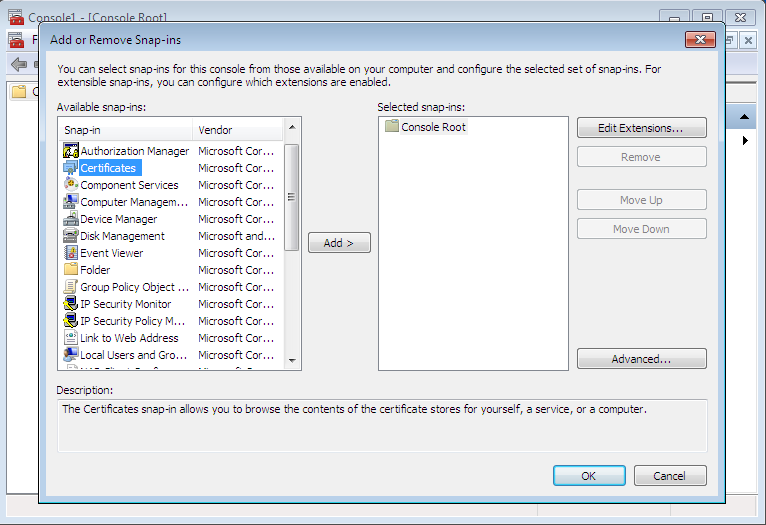 Fig. 11. Add a snapin
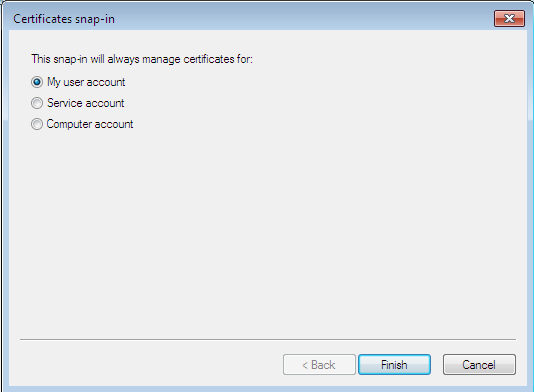 Fig. 12. A snapin of certificate manager
Then press OK and proceed to Certificates, Personal, Certificates in the window that appears. You can see the certificates created for the current user (Fig. 13). In my case, the user name is test. Right-click on his certificate and choose Delete to delete the certificate. You will see the warning that you will be unable to decrypt the data decrypted with this certificate. Well, we shall check it soon.
Fig. 12. A snapin of certificate manager
Then press OK and proceed to Certificates, Personal, Certificates in the window that appears. You can see the certificates created for the current user (Fig. 13). In my case, the user name is test. Right-click on his certificate and choose Delete to delete the certificate. You will see the warning that you will be unable to decrypt the data decrypted with this certificate. Well, we shall check it soon.
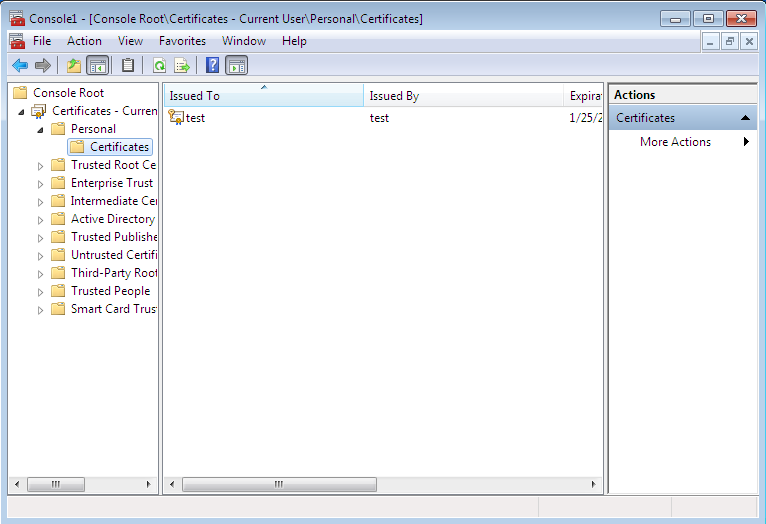 Fig. 13. Personal certificates
 Fig. 14. Warning at deleting of a certificate
Now do the following.
Fig. 14. Warning at deleting of a certificate
Now do the following.
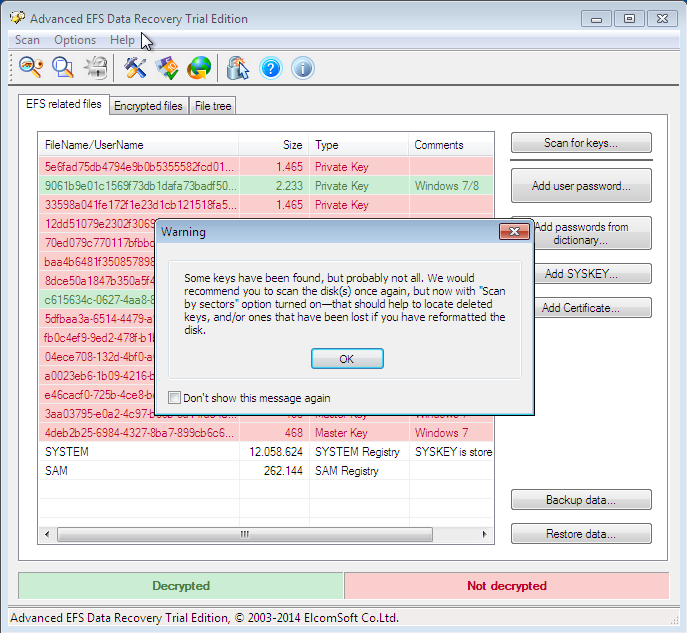 Fig. 15. Scan for keys
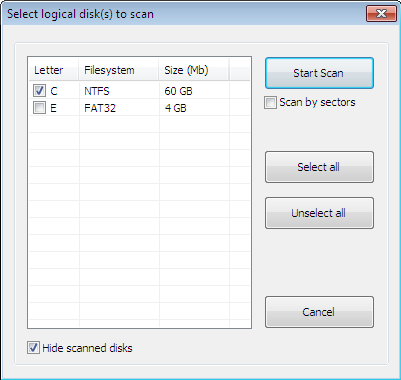 Fig. 16. Window of scanning
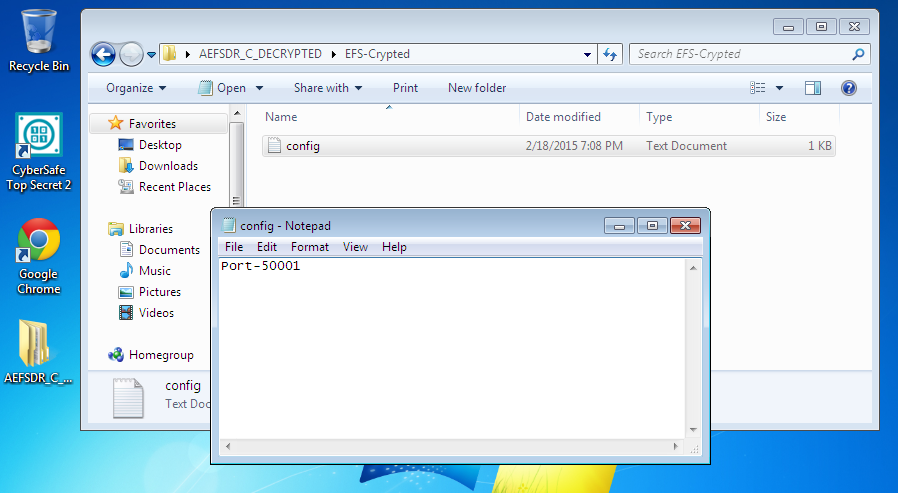 Fig. 17. The file is decrypted again
To EFS’s shame or Advanced EFS Data Recovery’s credit, the file was decrypted in both cases. And I needed no special knowledge or skills throughout the process. Just launch the program and it will do all the necessary for you. How this program functions, you can learn from its developers’ website (http://www.elcomsoft.ru/). In this article, we shall not examine its operation principles too close, because AEFSDR is not the subject of the publication.
It should be noticed that a professional can adjust his system to make Advanced EFS Data Recovery useless. However, we have examined the most common implementation of EFS for the vast majority of users.
A transparent encryption system implemented in CyberSafe Top Secret
Let’s see how transparent encryption has been implemented in CyberSafe. To do this, it uses the Alfa Transparent File Encryptor driver (http://www.alfasp.com/products.html), which encrypts files using the algorithm AES-256.
An encryption rule (file mask, allowed/prohibited processes etc.) and an encryption key are transmitted to the driver. The encryption key itself is stored in the folder’s ADS (Alternate Data Stream) and encrypted with OpenSSL (RSA algorithm) or GOST Р 34.10-2001, this is what the certificates are used for.
Here is the logics: add a folder, CyberSafe creates a key for the driver and encrypts it with selected public certificates (they have to be preliminarily created and imported to CyberSafe). When a user attempts to get an access to the folder, CyberSafe opens the folder’s ADS and reads the encrypted key. If this user has a private certificate key (he may have one or multiple own certificates), which has been applied to encrypt the key, he can open this folder and read the files. It should be noticed that the driver decrypts only the requested information rather than the entire file, when the access is available. For example, when a user opens a big Word document, only the portion being uploaded to the editor at the moment is decrypted, the remaining is uploaded as and when needed. A small file will be decrypted entirely, while other files remain encrypted.
If the folder is network shared, its files remain encrypted . The client driver decrypts only a file or a part of a file in the memory, the same situation occurs for a local folder as well. During editing of the file, the driver encrypts changes in the memory and writes them to the file. In other words, even when the folder is on (we shall show what it means below), data on the disk always remain encrypted.
Using the CyberSafe Top Secret program for transparent encryption of files and folders
Now, it’s time to look at practical implementation of CyberSafe Top Secret. For folder encryption, go to the program’s section Transparent encryption (File encryption tab), see Fig. 18. Then drag and drop to the work area those folders from the Explorer, which you would like to encrypt. You can also use the Add Folder button. I have added one folder - C:\CS-Crypted.
Fig. 17. The file is decrypted again
To EFS’s shame or Advanced EFS Data Recovery’s credit, the file was decrypted in both cases. And I needed no special knowledge or skills throughout the process. Just launch the program and it will do all the necessary for you. How this program functions, you can learn from its developers’ website (http://www.elcomsoft.ru/). In this article, we shall not examine its operation principles too close, because AEFSDR is not the subject of the publication.
It should be noticed that a professional can adjust his system to make Advanced EFS Data Recovery useless. However, we have examined the most common implementation of EFS for the vast majority of users.
A transparent encryption system implemented in CyberSafe Top Secret
Let’s see how transparent encryption has been implemented in CyberSafe. To do this, it uses the Alfa Transparent File Encryptor driver (http://www.alfasp.com/products.html), which encrypts files using the algorithm AES-256.
An encryption rule (file mask, allowed/prohibited processes etc.) and an encryption key are transmitted to the driver. The encryption key itself is stored in the folder’s ADS (Alternate Data Stream) and encrypted with OpenSSL (RSA algorithm) or GOST Р 34.10-2001, this is what the certificates are used for.
Here is the logics: add a folder, CyberSafe creates a key for the driver and encrypts it with selected public certificates (they have to be preliminarily created and imported to CyberSafe). When a user attempts to get an access to the folder, CyberSafe opens the folder’s ADS and reads the encrypted key. If this user has a private certificate key (he may have one or multiple own certificates), which has been applied to encrypt the key, he can open this folder and read the files. It should be noticed that the driver decrypts only the requested information rather than the entire file, when the access is available. For example, when a user opens a big Word document, only the portion being uploaded to the editor at the moment is decrypted, the remaining is uploaded as and when needed. A small file will be decrypted entirely, while other files remain encrypted.
If the folder is network shared, its files remain encrypted . The client driver decrypts only a file or a part of a file in the memory, the same situation occurs for a local folder as well. During editing of the file, the driver encrypts changes in the memory and writes them to the file. In other words, even when the folder is on (we shall show what it means below), data on the disk always remain encrypted.
Using the CyberSafe Top Secret program for transparent encryption of files and folders
Now, it’s time to look at practical implementation of CyberSafe Top Secret. For folder encryption, go to the program’s section Transparent encryption (File encryption tab), see Fig. 18. Then drag and drop to the work area those folders from the Explorer, which you would like to encrypt. You can also use the Add Folder button. I have added one folder - C:\CS-Crypted.
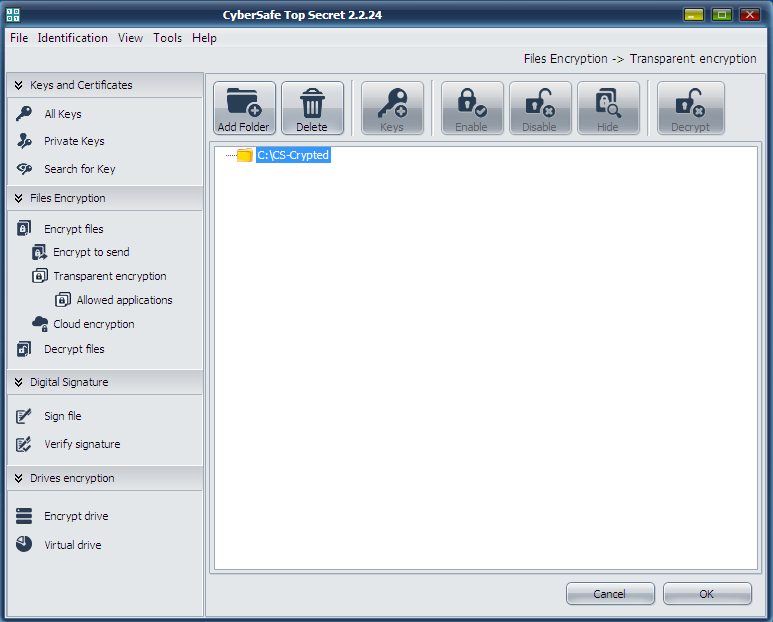 Fig. 18. The CyberSafe Top Secret program
Press the Apply button. In the window that appears (Fig. 19) press Yes or Yes for all (if you want to encrypt some folders at once). Then you will see a window for choosing certificates, keys of which will be used for transparent encryption of the folder (Fig. 20). As a rule, certificates are created straight after the program installation. If you did not perform it as yet, you will need to return to the Private keys section and press Create.
Fig. 18. The CyberSafe Top Secret program
Press the Apply button. In the window that appears (Fig. 19) press Yes or Yes for all (if you want to encrypt some folders at once). Then you will see a window for choosing certificates, keys of which will be used for transparent encryption of the folder (Fig. 20). As a rule, certificates are created straight after the program installation. If you did not perform it as yet, you will need to return to the Private keys section and press Create.
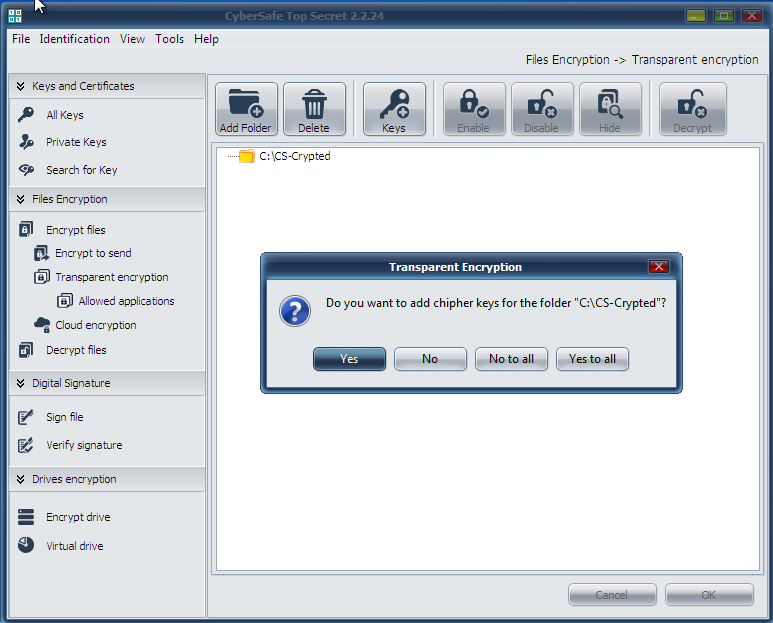 Fig. 19. Press Yes
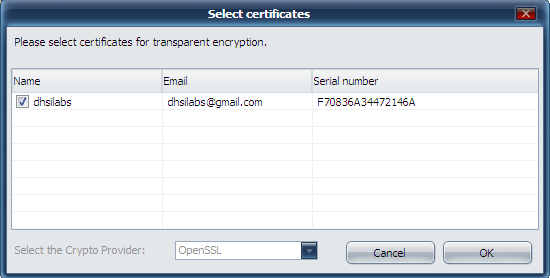 Fig. 20. Choosing certificates for transparent encryption
The next question the program poses: should an administrator key be installed for this folder? (Fig. 21). You can not make changes to a folder if you have no administrator key, so press Yes.
Fig. 20. Choosing certificates for transparent encryption
The next question the program poses: should an administrator key be installed for this folder? (Fig. 21). You can not make changes to a folder if you have no administrator key, so press Yes.
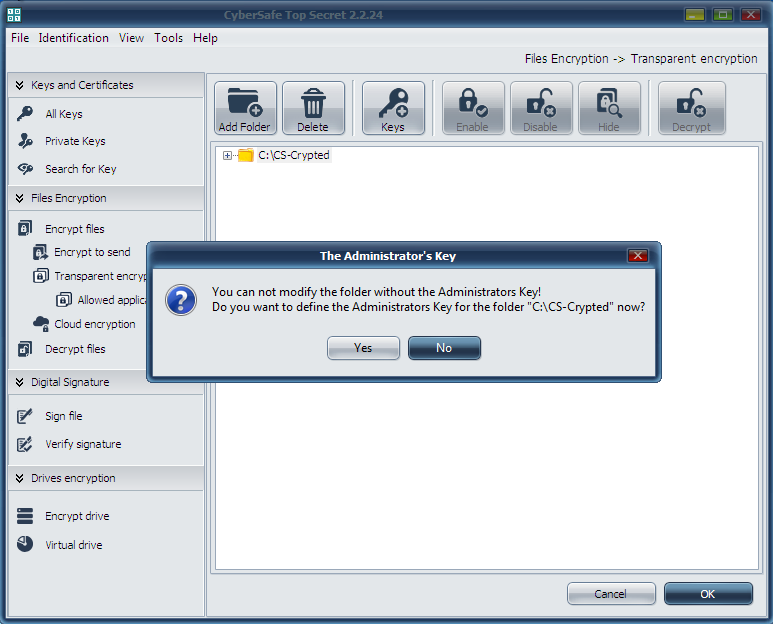 Fig. 21. Press Yes again.
After this, you will return to the main window of the program. Prior to work with the encrypted folder, select it and click Enable. The program will request a password of the certificate assigned to encrypt the folder (Fig. 22). Further on, the work with the encrypted folder will be absolutely the same as with any usual folder. In the CyberSafe window, the folder will be marked open, with a lock picture to the left of the folder icon (Fig. 23).
Fig. 21. Press Yes again.
After this, you will return to the main window of the program. Prior to work with the encrypted folder, select it and click Enable. The program will request a password of the certificate assigned to encrypt the folder (Fig. 22). Further on, the work with the encrypted folder will be absolutely the same as with any usual folder. In the CyberSafe window, the folder will be marked open, with a lock picture to the left of the folder icon (Fig. 23).
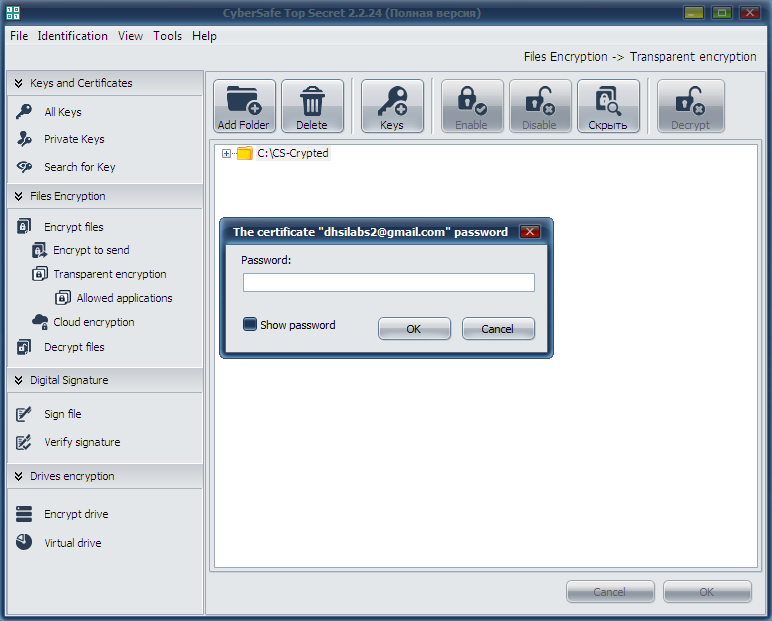 Fig. 22. Enter the certificate password
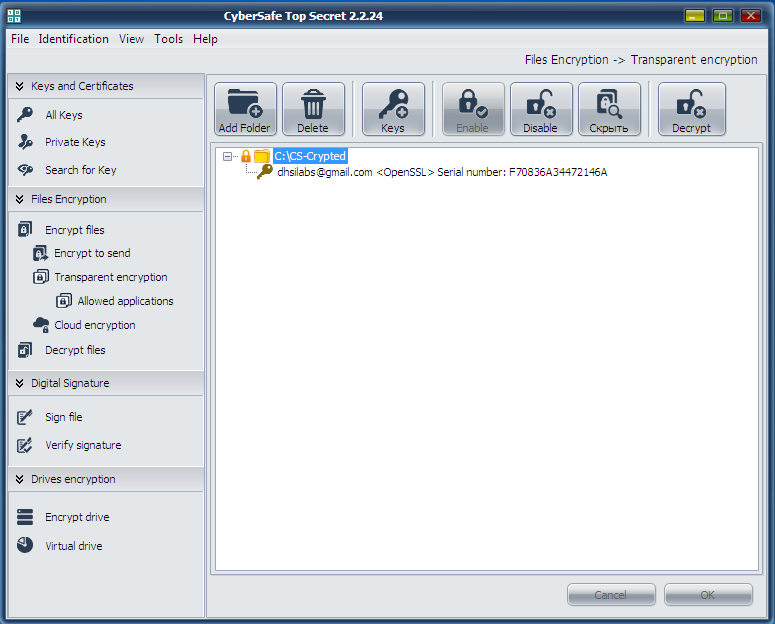 Fig. 23. The encrypted folder is on
There are no marks for encrypted folders or encrypted files in Explorer. They look just like other folders and files (in contrast to EFS, where names of encrypted folders/files are highlighted in green), see Fig. 24.
Fig. 23. The encrypted folder is on
There are no marks for encrypted folders or encrypted files in Explorer. They look just like other folders and files (in contrast to EFS, where names of encrypted folders/files are highlighted in green), see Fig. 24.
 Fig. 24. The encrypted folder CS-Crypted in Explorer
It should be mentioned that you can encrypt any network folder in the same way. To do it, the CyberSafe program is to be installed only on a user PC rather than on a file server. The whole process of encryption is performed on a client; a server receives files already encrypted. Such approach is absolutely reasonable. Firstly, only encrypted data circulate in the network. Secondly, even when the server administrator wants to access the files, he can not do it, because the files can be decrypted only by users, whose certificates have been assigned for encryption. On the other hand, the administrator can backup encrypted files.
When the encrypted folder is not needed any more, you should go to the CyberSafe program, select the folder and click Disable. This solution may seem to be less handy as compared to EFS, while you need to press Enable/Disable buttons. But this is only superficial impression. Firstly, the user clearly understands that the folder is encrypted and he will keep it in mind reinstalling Windows. Secondly, with EFS, if you need to leave your PC for a while, you should exit the system, because anybody can take use of your absence to obtain access to your files. To do it, he should just copy the files to a device, which does not support encryption (e.g. FAT32 flash-drive). Then he will be able to read your files away from your PC. The situation is a bit more convenient with the CyberSafe program. Yes, you have an extra action to do (turn off the folder) to make your encrypted files inaccessible. However, you do not need to launch all your programs and open all your documents (including not encrypted ones) reentering the system.
However, every product has its characteristic traits. CyberSafe is no exception. Assume, we have encrypted the folder C:\CS-Crypted and placed the file report.txt into it. When the folder is off, you can not read the file, of course. When the folder is on, you can get access to the file and, accordingly, copy it to any other folder, which is not encrypted. Copied to a non-encrypted folder, the file will live its own life. On one hand, it is not as convenient as with EFS; on the other hand, being aware of this feature of the program, users will keep more rigorous discipline and store their confidential files in encrypted folders only.
Performance
Let’s try to estimate which program works faster - EFS or CyberSafe Top Secret. All the tests have been run on a real PC, no virtual machines. The notebook configuration: Intel 1000M (1.8 GHz)/4 Gb RAM/WD WD5000LPVT (500 Gb, SATA-300, 5400 RPM, buffer 8 Mb/Windows 7 64-bit). Not a very powerful computer, but that’s all I had at hand.
The test will be maximum simple. We shall copy files to each folder and see how much time the copying will take. To understand which transparent encryption tool works faster, we shall use the following simple script:
Fig. 24. The encrypted folder CS-Crypted in Explorer
It should be mentioned that you can encrypt any network folder in the same way. To do it, the CyberSafe program is to be installed only on a user PC rather than on a file server. The whole process of encryption is performed on a client; a server receives files already encrypted. Such approach is absolutely reasonable. Firstly, only encrypted data circulate in the network. Secondly, even when the server administrator wants to access the files, he can not do it, because the files can be decrypted only by users, whose certificates have been assigned for encryption. On the other hand, the administrator can backup encrypted files.
When the encrypted folder is not needed any more, you should go to the CyberSafe program, select the folder and click Disable. This solution may seem to be less handy as compared to EFS, while you need to press Enable/Disable buttons. But this is only superficial impression. Firstly, the user clearly understands that the folder is encrypted and he will keep it in mind reinstalling Windows. Secondly, with EFS, if you need to leave your PC for a while, you should exit the system, because anybody can take use of your absence to obtain access to your files. To do it, he should just copy the files to a device, which does not support encryption (e.g. FAT32 flash-drive). Then he will be able to read your files away from your PC. The situation is a bit more convenient with the CyberSafe program. Yes, you have an extra action to do (turn off the folder) to make your encrypted files inaccessible. However, you do not need to launch all your programs and open all your documents (including not encrypted ones) reentering the system.
However, every product has its characteristic traits. CyberSafe is no exception. Assume, we have encrypted the folder C:\CS-Crypted and placed the file report.txt into it. When the folder is off, you can not read the file, of course. When the folder is on, you can get access to the file and, accordingly, copy it to any other folder, which is not encrypted. Copied to a non-encrypted folder, the file will live its own life. On one hand, it is not as convenient as with EFS; on the other hand, being aware of this feature of the program, users will keep more rigorous discipline and store their confidential files in encrypted folders only.
Performance
Let’s try to estimate which program works faster - EFS or CyberSafe Top Secret. All the tests have been run on a real PC, no virtual machines. The notebook configuration: Intel 1000M (1.8 GHz)/4 Gb RAM/WD WD5000LPVT (500 Gb, SATA-300, 5400 RPM, buffer 8 Mb/Windows 7 64-bit). Not a very powerful computer, but that’s all I had at hand.
The test will be maximum simple. We shall copy files to each folder and see how much time the copying will take. To understand which transparent encryption tool works faster, we shall use the following simple script:
@echo off
echo "Copying 5580 files to EFS-Crypted"
echo %time%
robocopy c:\Joomla c:\EFS-Crypted /E > log1
echo %time%
echo " Copying 5580 files to CS-Crypted"
echo %time%
robocopy c:\Joomla c:\CS-Crypted /E > log2
echo %time%
You need not to be a top programmer to understand how this script works. No secret, that we mostly work with small files, from some dozens to some hundreds Kb in size, The script copies the distribution kit Joomla! 3.3.6, which includes 5580 small files, to a EFS-encrypted folder first, and then – to a CyberSoft-encrypted folder. Let’s find out the winner.
Robocopy is the command used for recursive copying of files, including empty ones (/E parameter). Its output is intentionally redirected to a text file (we can see what has been copied and what has not, if needed), to keep the script’s output clear.
The results of the second test are shown on Fig. 25. You can see that EFS required 74 seconds to fulfill the task, while CyberSoft showed the result of 32 seconds only. Allowing for the fact, that users work mostly with numerous small files, CyberSafe is twice as fast compared to EFS.
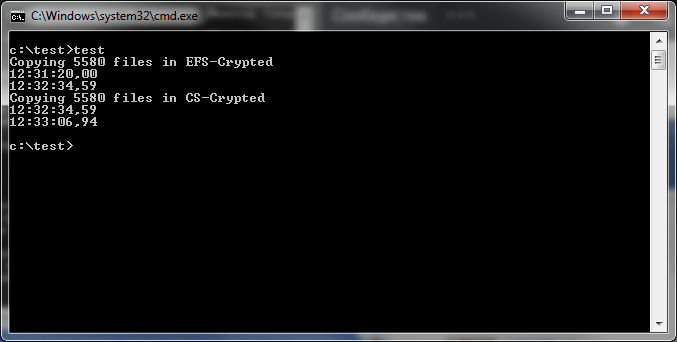 Fig. 25. Results of testing
Advantages of CyberSafe transparent encryption
Let’s sum up. The following factors are in favour of CyberSafe transparent encryption:
Fig. 25. Results of testing
Advantages of CyberSafe transparent encryption
Let’s sum up. The following factors are in favour of CyberSafe transparent encryption:
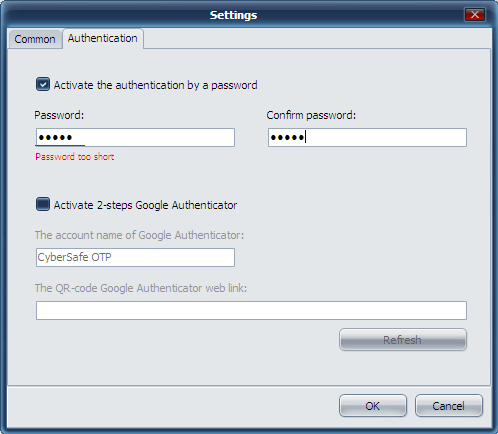 Fig. 26. Protection of the CyberSafe program itself
On the Authorised tab of the application, you can specify trusted applications authorised to work with encrypted files. All applications are trusted by default. To enhance security, you can specify applications authorised to work with encrypted files. On Fig. 27, I specified MS Word and MS Excel as authorised. The access to the encrypted folder will be denied for any other program attempting to obtain it. For more information, see the article "Transparent encryption on a local PC by means of CyberSafe Files Encryption” (http://habrahabr.ru/company/cybersafe/blog/210458/)..
Fig. 26. Protection of the CyberSafe program itself
On the Authorised tab of the application, you can specify trusted applications authorised to work with encrypted files. All applications are trusted by default. To enhance security, you can specify applications authorised to work with encrypted files. On Fig. 27, I specified MS Word and MS Excel as authorised. The access to the encrypted folder will be denied for any other program attempting to obtain it. For more information, see the article "Transparent encryption on a local PC by means of CyberSafe Files Encryption” (http://habrahabr.ru/company/cybersafe/blog/210458/)..
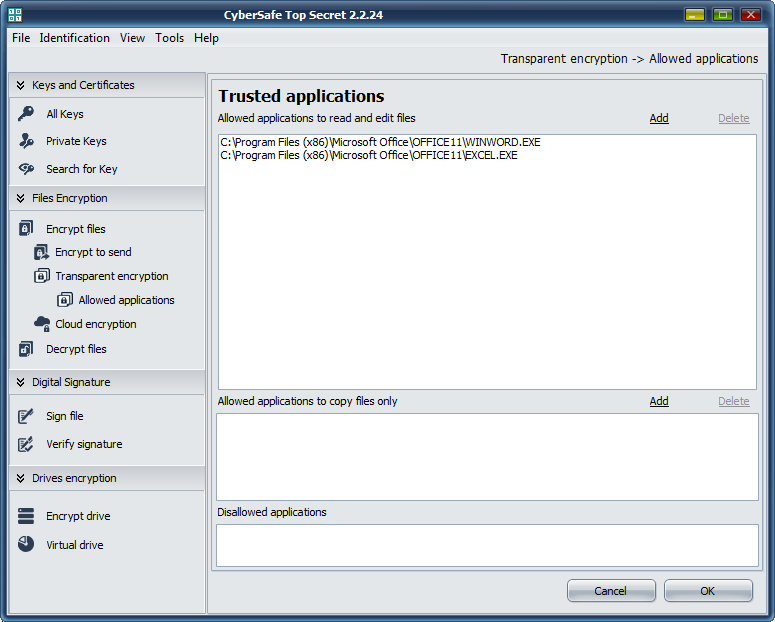 Fig. 27. Trusted applications
That’s all for now. We recommend to read the articles:
Transparent encryption on a local PC by means of CyberSafe Files Encryption
Methods of hiding files and folders
Fig. 27. Trusted applications
That’s all for now. We recommend to read the articles:
Transparent encryption on a local PC by means of CyberSafe Files Encryption
Methods of hiding files and folders